How I Made a Simple Arduino Game
You probably don’t know (How would you? I haven’t written about this yet) that I’m taking Arduino programming classes. It’s only been the second lesson and my entire being yearns to start creating things. Since these classes are entry level, we’ve only been doing basics so far, to grasp the concepts and solidify our basic knowledge.
Don’t get me wrong, this is great for beginners, but having a bit more programming experience and knowing the general basics of electronics (don’t stick a fork in the wall outlet or whatever) I woke up this Friday eager to get to work on a weekend project, and so I did. This is the story of how I made a simple Arduino game.
I tried to think of something that will sharpen my programming skills while still being fun and intriguing and while going through the various sensors, displays and motors we have recieved in class the 8x8 LED matrix started to give me some sensual looks and I have decided to program a simple space/chicken invaders-ish game. (Disclaimer: It’s not as good as either of those but it was actually a blast to make);
The game’s mechanics are fairly simple, the player can move freely in the bottom row of the screen, the enemies spawn at the top and move down with each pre-defined cycle.
If an enemy hits the player - game over
If an enemy passes the player without hitting him/her - Another enemy will respawn, and the player will get a point.
It took me about a day and a half to completely figure it all out and get rid of all of the pesky bugs I have found, it proved to be not as easy as I thought, if I’m completely honest.
Basic game mechanics
Anyway, I knew I had to implement the following stuff in my code:
- Player position & movement - left or right, defined by button presses
- Enemy spawning & re-spawning
- Enemy movement
- The main game logic (basically checking if the enemy and the player have collided)
I have only used one library to address the 64 addressable LEDs on the 8x8 matrix, the library is no other than Adafruit’s NeoPixel.
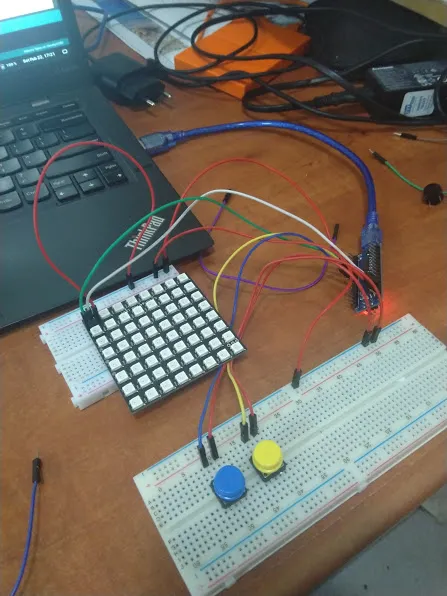
Here is a picture of the hardware:

Here’s the basic layout:
- Left button connects to pin 5
- Right button connects to pin 7
- LED matrix connects to pin 9 and 5V
- Everything is grounded in one way or another (all red wires)
- The purple wire is just chilling so I didn’t want to bother it
Now that we got this out of the way. it’s time to get to the actual code.
Programming the game
The first thing I wanted to implement is the movement of the player, since this is an 8x8 matrix and I wanted the player to start in the middle, I have decided to make the player take up 2 pixels (or LEDs, if you will. I’m going to use those interchangeably) in the first row (which is the last 8 positions on the matrix), in positions 58 and 59.
I have created 2 variables to track the player’s left and right position and simply stated that if the respective button is pressed, the “avatar” moves in that direction.
void moveLeft(int leftPosition, int rightPosition) {
  // Make sure player doesn't move into the 2nd row
  if(!(playerLeftAvatarPosition == 56)) {
    // Offset player to the left
    pixels.setPixelColor(playerLeftAvatarPosition, backgroundColor);
    pixels.setPixelColor(playerRightAvatarPosition, backgroundColor);
    playerLeftAvatarPosition--;
    playerRightAvatarPosition--;
    pixels.setPixelColor(playerLeftAvatarPosition, playerColor);
    pixels.setPixelColor(playerRightAvatarPosition, playerColor);
    // Apply changes to the grid
    pixels.show();
  }
}

void moveRight(int leftPosition, int rightPosition) {
  // Make sure player doesn't leave the matrix
  if (!(playerRightAvatarPosition == 63)) {
    // Offset player to the right
    pixels.setPixelColor(playerLeftAvatarPosition, backgroundColor);
    pixels.setPixelColor(playerRightAvatarPosition, backgroundColor);
    playerLeftAvatarPosition++;
    playerRightAvatarPosition++;
    pixels.setPixelColor(playerLeftAvatarPosition, playerColor);
    pixels.setPixelColor(playerRightAvatarPosition, playerColor);
    // Apply changes to the grid
    pixels.show();
  }
}
This was obviously the easiest thing in the program (although I did have to come up with a creative way to execute everything in a timely manner without using the delay() function and not rocket launch the player in any direction).
I have created a couple of variables that pertain to enemies. I have created an integer to declare how many maximum enemies I want on the board on a given time, an integer to represent the actual amount of enemies on the board, and an array to track all the enemies’ positions.
First of all we have to make a function to spawn enemies. I have designed it in a way that the spawning function will only be triggered in the early stages of the script and instead of re-spawning the enemies, I used a trick where I basically reset their position to a random negative position out of the board and that makes stuff a little more interesting since each enemy’s advancement on the board isn’t predetermined.
void spawnEnemy() {
      // Run for amount of current enemies (initializes at 1) - This only runs in the early stages of the game, resetDeadEnemy() takes care of respawning later
      for (int i = 0; i < amountOfEnemies; i++) {
        int enemyRandomPosition = random(1,9);
        Serial.println("Trying to spawn");
        // Check if enemy already exists in this column
        if ((enemyPositions[i] % 8) != enemyRandomPosition) {
          amountOfEnemies++;
          pixels.setPixelColor(enemyRandomPosition-1, enemyColor);
          enemyPositions[i] = enemyRandomPosition;
          Serial.println("Spawning");
          delay(1);
          pixels.show();
          break;
        }
     }
}

void moveEnemies() {
  // Move all enemies on board
  for(int i=0; i < maxEnemies; i++) {
    pixels.setPixelColor(enemyPositions[i]-1, backgroundColor);
    enemyPositions[i] = enemyPositions[i] + 8;
    pixels.setPixelColor(enemyPositions[i]-1, enemyColor);
    pixels.show();
    // Enemy respawning is handled within the resetDeadEnemy() function
    resetDeadEnemy(i);
  }
  Serial.println("Moving");
}

void resetDeadEnemy(int num) {
  if (enemyPositions[num] >= 75) {
      // Respawn enemy with a random offset if the enemy is behind the player, reduce enemy from amount of enemies and add a point to the player's score
      enemyPositions[num] = random(-100,-50);
      amountOfEnemies--;
      score++;
      Serial.println("Resetting");
      Serial.println(score);
  }
  pixels.show();
}
That’s all great, the enemies move spawn and move towards the player, and the player can evade. The only problem? The game has no logic
In order to create the logic for the game, I wrote a function that will simply check if any of the enemies’ location on the board matches either the left or the right position of the player.
If it matches, a big X will flash a few times to indicate that the game is over (Score will be sent over the Serial interface. I have also created a function that will reset the game, and have configured the program in a way that allows the user to quickly restart the game if they press the left button after the game is over.
void checkLoss() {
  // Check if any of the enemies hit the player
  for(int i = 0; i < maxEnemies; i++) {
    if((enemyPositions[i] == playerLeftAvatarPosition+1) or (enemyPositions[i] == playerRightAvatarPosition+1)) {
      playerLost = true;
      // Flash big X
      for (int flashTimes = 0; flashTimes < 3; flashTimes++) {
        for(int led = 0; led < ledCount; led++) {
          pixels.setPixelColor(led, backgroundColor);
        }
        pixels.show();
        delay(300);
        for(int i = 0; i < 8; i++) {
          pixels.setPixelColor(topLeftToBottomRight[i], enemyColor);
          pixels.setPixelColor(bottomLeftToTopRight[i], enemyColor);
        }
        pixels.show();
        delay(300);
      }
      Serial.println(score);
    }
  }
}
Eventually, I have triggered everything based on (mostly) the result I got from the millis() function to make sure everything happens more or less simultaneously (to the human eye, at least).
void setup() {
  Serial.begin(9600);
  pinMode(matrixPin, OUTPUT);
  pinMode(leftButtonPin, INPUT_PULLUP);
  pinMode(rightButtonPin, INPUT_PULLUP);
  pixels.begin(); // Initialize LED matrix
  // Set background color to all LEDs
  for (int i = 0; i < ledCount; i++) {
     pixels.setPixelColor(i, backgroundColor);
  }
  // Spawn player
  pixels.setPixelColor(playerLeftAvatarPosition, playerColor);
  pixels.setPixelColor(playerRightAvatarPosition, playerColor);
  pixels.show();
  delay(1000);
}

void loop() {
  // Determine if player wants to move left
  if(!(digitalRead(leftButtonPin)) and (digitalRead(rightButtonPin)) and millis() % sensitivityDelay <= 2) {
    moveLeft(playerLeftAvatarPosition, playerRightAvatarPosition);
    delay(1);
  }

  // Determine if player wants to move right
  if(!(digitalRead(rightButtonPin)) and (digitalRead(leftButtonPin)) and millis() % sensitivityDelay <= 2) {
    moveRight(playerLeftAvatarPosition, playerRightAvatarPosition);
    delay(1);
  }

  // Determine if max enemies are present, if not - spawns an enemy (only happens in the early stages of the game)
  if((millis() % enemySpawnSpeed <= 3) and amountOfEnemies <= maxEnemies) {
    spawnEnemy();
    delay(2);
  }

  // Move enemies
  if(millis() % enemyMoveSpeed <= 2) {
    moveEnemies();
    delay(2);
  }

  // Check if player just lost
  if (playerLost == false) {
    checkLoss();
  }
  // Execute if player lost, make all LEDs background color and wait for signal to reset the game
  else {
    while (true) {
        for (int i = 0; i < ledCount; i++) {
          pixels.setPixelColor(i, backgroundColor);
     }
     pixels.show();
     if(!digitalRead(leftButtonPin)) {
      reset();
     }
    }
  }
}
The end result
Thanks for reading, you can find my code in its entirety on GitHub.